1. 课程简介
项目地址 git clone https://gitee.com/childe-jia/my-message.git
背景: 该课程是基于Vue3 + Typescript + Vite构建, 教会大家封装Element-Plus组件
具备能力:
- 最新的 Vue3 及相关技术
- 组件的设计思想
- 大厂的开发模式/代码规范
技术:
-
Vue3-
首次渲染 / diff 算法 更快
-
内存占用 / 打包体积 更少
-
Composition API组合 API
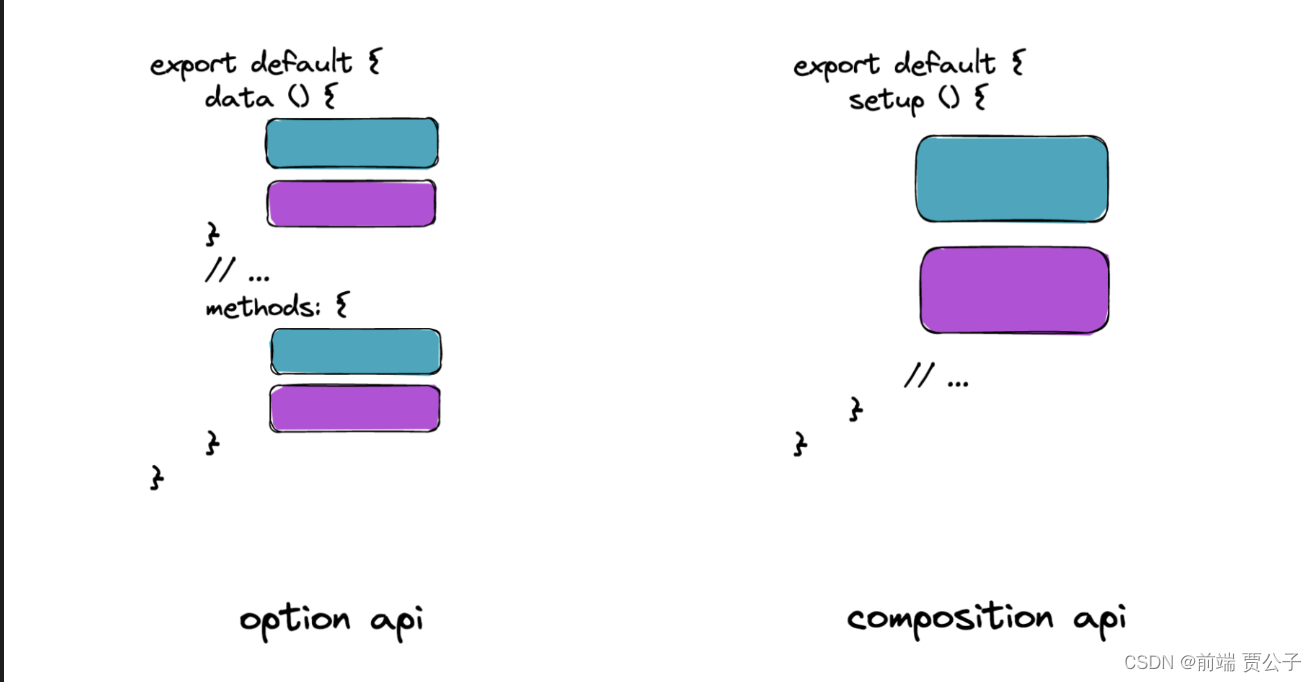
- Options API:基于对象的方式,将组件的各种选项,如data、methods、computed等,组织在一个对象中
- Composition API:允许我们将组件的逻辑拆分成更小的、可复用的部分,从而实现更高度的组件复用。
-
-
Typescript-
介绍: 是一种带有
类型语法的 JavaScript 语言,在任何使用 JavaScript 的开发场景中都可以使用。- JavaScript 代码
// 没有明确的类型 const age = 18- TypeScript 代码
// 有明确的类型,可以指定age是number类型(数字类型) const age: number = 18 -
作用: 编译时进行类型检查提示错误
const num = 18;
num.toLowerCase()
// Uncaught TypeError: num.toLowerCase is not a function
这些错误导致在开发项目的时候,需要花挺多的时间去定位和处理 BUG
原因:
- JS 是动态类型的编程语言,动态类型最大的特点就是它只能在
代码执行期间做类型的相关检查,所以往往你发现问题的时候,已经晚了。
解决方案
- TS 是静态类型的编程语言,代码会先进行编译然后去执行,在
代码编译期间做类型的相关检查,如果有问题编译是不通过的,也就暴露出了问题。
TS 优势
-
更早发现错误,提高开发效率
-
随时随地提示,增强开发体验
-
强大类型系统,代码可维护性更好
- JS 是动态类型的编程语言,动态类型最大的特点就是它只能在
-
-
Vite-
一种新型前端构建工具,能够显著提升前端开发体验
-
对比
webpack-
webpack构建原理- 需要查找依赖,打包所有的模块,然后才能提供服务,更新速度会随着代码体积增加越来越慢
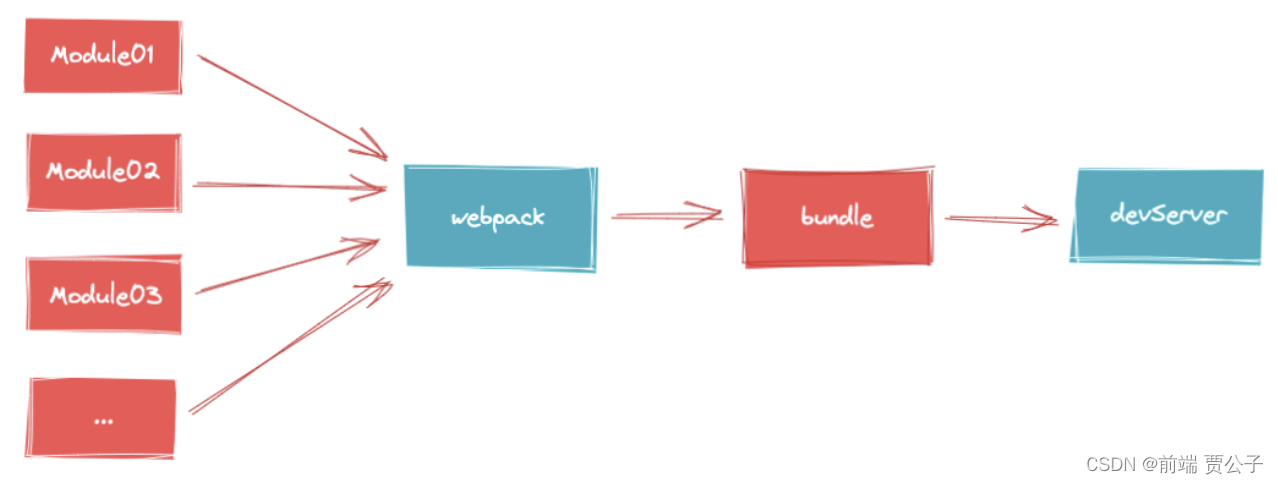
- 需要查找依赖,打包所有的模块,然后才能提供服务,更新速度会随着代码体积增加越来越慢
-
-
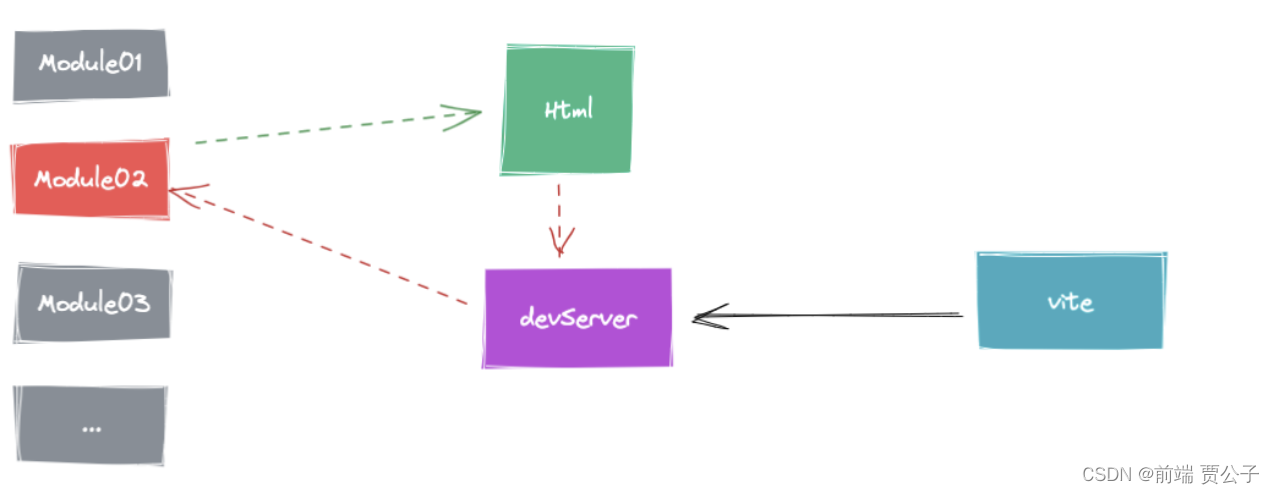
vite的原理- 使用原生 ESModule 通过 script 标签动态导入,访问页面的时候加载到对应模块编译并响应
-
Vue3 + TS + Vite最新的开发技术栈,你还在等什么…
2. 项目创建
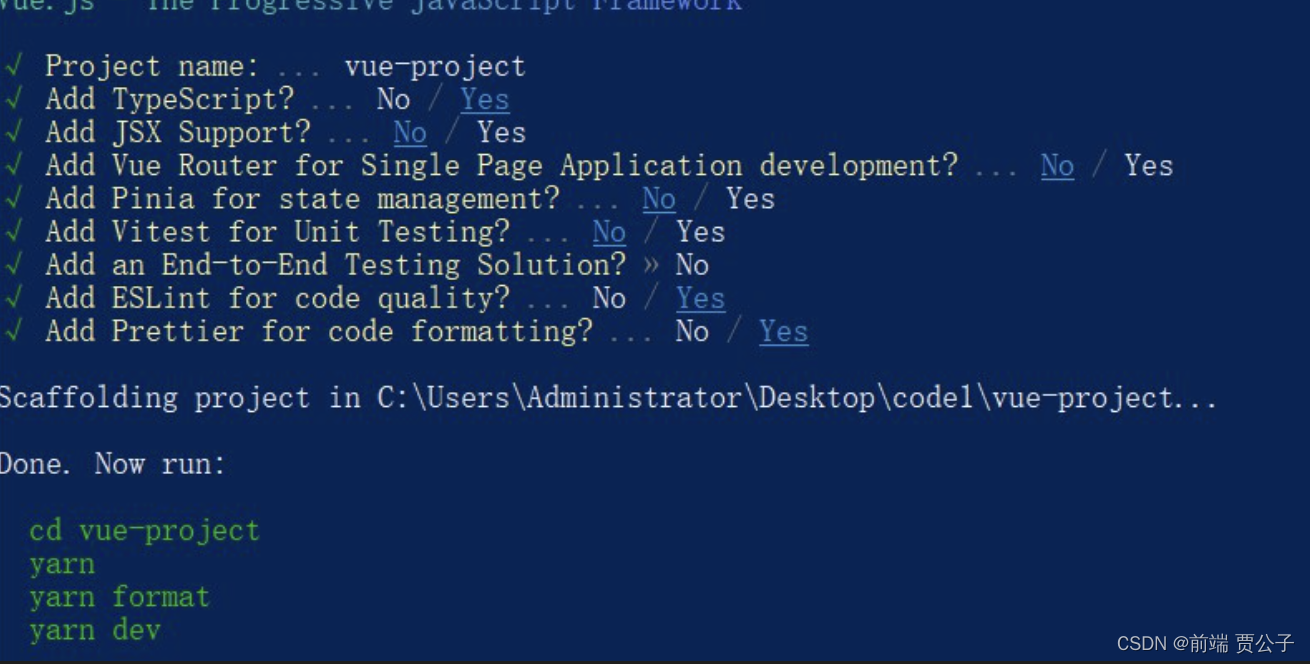
掌握:使用 create-vue 脚手架创建项目
create-vue参考地址:https://github.com/vuejs/create-vue
-
执行创建命令:
# pnpm pnpm create vue # npm npm init vue@latest # yarn yarn create vue -
选择项目依赖内容
3. 组件需求分析
3.1 Message 消息提示 - 组件分析
功能分析
- 常用于主动操作后的反馈提示
- 提示在一定时间后可以消失
- 可以手动关闭
- 有多种类型 ( success warning error message)
难点
-
使用函数式的方式来创建组件
createMessage('hello Vue', props)
// 如何将一个组件函数式的渲染到一个节点上?
// 可以采用createApp?.....
类型属性分析

```typescript
interface MessageProps {
    message?: stirng;
    duration?: number;
    showClose?: boolean;
    type?: 'primary' : 'success' : ....
}
事件以及实例
const instance = createMessage('hello world', props)
instance.close()
事件以及实例
const instance = createMessage('hello world', props)
instance.close()
3.2 Message组件创建
-
创建目录
- Message
- style.css - 样式
- Message.vue - 组件
- method.ts - api方法
- types.ts - 辅助的 typescript 类型
报错:
Component name “Message” should always be multi-word
原因:
要求组件名称以驼峰格式命名, 自定义组件名称应该由多个单词组成, 防止和html标签冲突, 所以会报错
解决:
.eslintrc.js
rules: { // 关闭组件命名规则 'vue/multi-word-component-names': 'off' } - Message
-
编写组件
Message.vue
<script setup lang="ts">
import { onMounted, ref } from 'vue';
import type { MessageProps } from './types'
const visible = ref(false)

const props = withDefaults(defineProps<MessageProps>(), {
  duration: 3000,
  type: 'message'
})
function startTimer() {
  if (props.duration === 0) return
  setTimeout(() => {
    visible.value = false
  }, props.duration);
}

onMounted(() => {
  visible.value = true
  startTimer()
})
</script>

<template>
  <div class="message-box" v-show="visible">
    <div class="message_content">
      <span>{{ message }}</span>
    </div>
      <img v-if="showClose" @click="visible = false" src="./close1.png" alt="">
  </div>
</template>

<style scoped>
.message-box {
  width: max-content;
  position: fixed;
  left: 50%;
  top: 20px;
  transform: translateX(-50%);
  border: 1px solid skyblue;
}
</style>
types.ts
interface MessageProps {
    message?: stirng;
    duration?: number;
    showClose?: boolean;
    type?: 'primary' : 'success' : ....
}
App.vue
import Message from './components/Message/Message.vue'

<Message message="hello vue" :duration="0"></Message>
3.4 将组件Render到DOM节点上
使用createApp 的弊端
-
该方法太重了, 它返回的是一个应用的实例, 而我们这里只需要轻量级的解决方法
-
隆重介绍render 函数
// 它负责将一个vnode渲染到dom节点上
// 它是一个轻量级的解决方案
import { render } from 'vue'
render(vNode, DOM节点)
method.ts
import MessageConstructor from "./Message.vue";
import type { MessageProps } from "./types";
import { render, h } from 'vue'
export  const createMessage = (props: MessageProps) => {
  const container = document.createElement('div')
  const vnode = h(MessageConstructor, props)
  render(vnode, container)
  document.body.appendChild(container.firstElementChild!)
}
App.vue
// import Message from './components/Message/Message.vue'

createMessage({ message: 'hello vue', duration: 0 })
3.5 移除节点
method.ts
// import MessageConstructor from "./Message.vue";
-- import type { MessageProps } from "./types";
++ import type { CreateMessageProps } from "./types";
// import { render, h } from 'vue'
++ export const createMessage = (props: CreateMessageProps) => {
//   const container = document.createElement('div')
++ const destroy = () => {
++    render(null, container)
++  }
++  const newProps = {
++    ...props,
++    onDestroy: destroy
++  }
++  const vnode = h(MessageConstructor, newProps)
  render(vnode, container)
  document.body.appendChild(container.firstElementChild!)
}
types.ts
export interface MessageProps {
 // ....
++ onDestroy: () => void
}

++ export type CreateMessageProps = Omit<MessageProps, 'onDestroy'>
Message.vue
<script setup lang="ts">
// ....
++ watch(visible, (newValue) => {
++  if (!newValue) {
++    props.onDestroy()
++  }
++ })
<script/>
3.6 获取上一个组件实例
types.ts
import type { VNode } from "vue";
export interface MessageContext {
  id: string;
  vnode: VNode;
  props: MessageProps
}
method.ts
++ import type { CreateMessageProps, MessageContext } from "./types";
++ const instances: MessageContext[] = []
++ let seed = 1
export  const createMessage = (props: CreateMessageProps) => {
++  const id = `message_${seed++}`
  const destroy = () => {
++    const idx = instances.findIndex(instance => instance.id === id)
++    if (idx === -1) return
++    instances.splice(idx, 1)
    render(null, container)
  }
// ....
  document.body.appendChild(container.firstElementChild!)
++  const instance = {
++    id,
++    vnode,
++    props: newProps
++  }
++  instances.push(instance)
++  return instance
}

++ export const getLastInstance = () => {
++  return instances[instances.length - 1]
++ }
Message.vue
import { getLastInstance } from './method'

const prevInstance = getLastInstance()
console.log('prevInstance', prevInstance);
3.7 动态计算组件位置
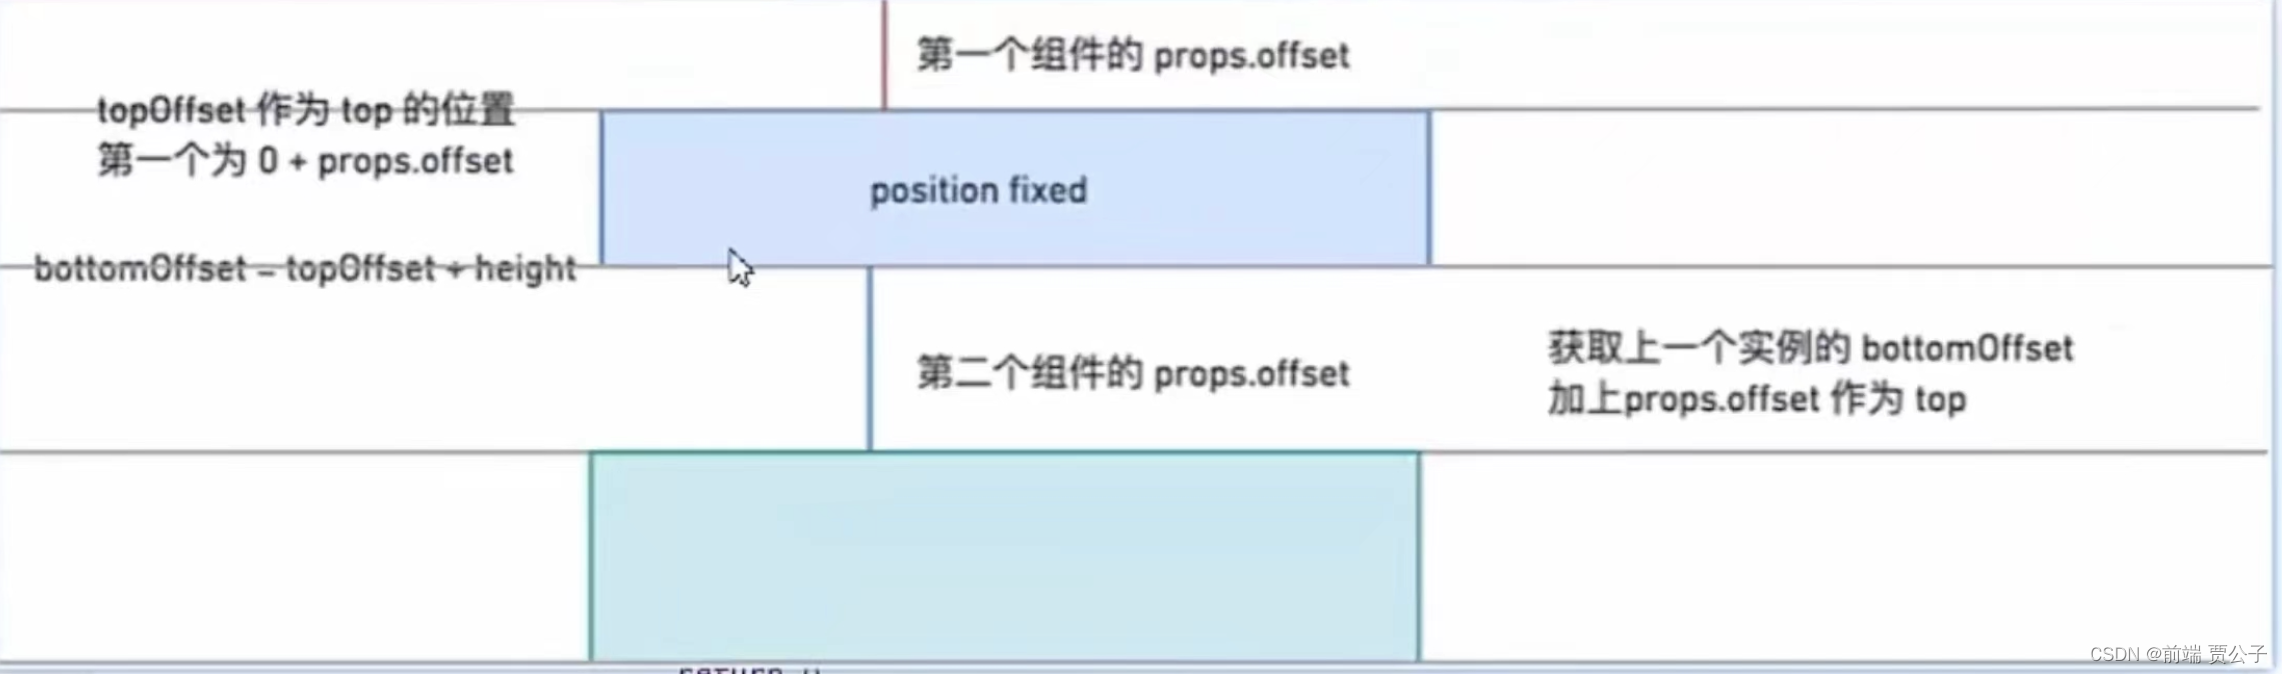
method.ts
// 伪方法: 获取上一个实例的最下面的坐标数字
export const getLastBottomOffset = () => {
  return 0
}
types.ts
export interface MessageProps {
  // ***
++  offset?: number
}
Message.vue
<script setup lang="ts">
++ import {  nextTick } from 'vue';
++ import {  getLastBottomOffset } from './method'
const visible = ref(false)

const props = withDefaults(defineProps<MessageProps>(), {
  duration: 3000,
  type: 'message',
++  offset: 20
})
// const prevInstance = getLastInstance()
// console.log('prevInstance', prevInstance);
++ const messageRef = ref<HTMLDivElement>()
// 计算偏移高度
// div的高度
++ const height = ref(0)
// 上一个实例的最下面的坐标数字, 是0
++ const lastOffset = computed(() => getLastBottomOffset())
// 该元素的top计算值
++ const topOffset = computed(() => lastOffset.value + props.offset)
// 这个元素为下一个元素预留的offset, 也就是它最低端的bottom的值
++ const bottomOffset = computed(() => height.value + topOffset.value)
++ const cssStyle = computed(() => ({
++   top: topOffset.value + 'px'
++ }))
++  onMounted(async () => {
  visible.value = true
  startTimer()
++   await nextTick()
++   height.value = messageRef.value!.getBoundingClientRect().height
})
watch(visible, (newValue) => {
  if (!newValue) {
    props.onDestroy()
  }
})
++ 当然bottomOffset要给下一个组件使用, 所以说需要暴露出去
++ defineExpose({
++   bottomOffset
++ })
</script>
++ div class="message-box" :style="cssStyle" ref="messageRef" v-show="visible">
3.8 获取bottomOffset
types.ts
++1111 import type { ComponentInternalInstance } from 'vue'
export interface MessageProps {
  // xxx
++33333  id: string
}
export interface MessageContext {
 // xxx
++11111  vm: ComponentInternalInstance
}
++ 3333 export type CreateMessageProps = Omit<MessageProps, 'onDestroy'| 'id'>
method.ts
export  const createMessage = (props: CreateMessageProps) => {
 //  ...
  const newProps = {
     // xx
++  id
  }
  const vnode = h(MessageConstructor, newProps)
+++1111 console.log('vnode', vnode);

  render(vnode, container)
  document.body.appendChild(container.firstElementChild!)
++ 2222  const vm = vnode.component!
  const instance = {
    // xxx
++ 2222   vm
  }
}
// 获取上一个实例的最下面的坐标数字
++ 33333 export const getLastBottomOffset = (id: string) => {
++      const idx = instances.findIndex(instance => instance.id === id)
++     if (idx <= 0) {
++      return 0
++     } else {
++      const prev = instances[idx -1]
++      return prev.vm.exposed!.bottomOffset.value
  }
}
Message.vue
++ 3333 const lastOffset = computed(() => getLastBottomOffset(props.id))

<template>
++ 3333 <div class="message_content">
++      {{ offset }} {{ topOffset }} {{ height }} {{ bottomOffset }} <br>
++      <span>{{ message }}</span>
++ </div>
</template>
3.9 解决Message重叠问题
method.ts
++ const instances: MessageContext[] = reactive([])

export const getLastBottomOffset = (id: string) => {
  const idx = instances.findIndex(instance => instance.id === id)
++  console.log('idx', id, idx, instances.length);
}
3.10 给组件实例添加删除方法
App.vue
onMounted(() => {
++  const instance = createMessage({ message: 'hello vue1', duration: 0 })
++  setTimeout(() => {
++    instance.destroy()
++  }, 2000);
})
meesage.vue
defineExpose({
  bottomOffset,
++  visible
})
method.ts
export  const createMessage = (props: CreateMessageProps) => {
++  const manuallyDestroy = () => {
++    const instance = instances.find(instance => instance.id === id)
++    if (instance) {
++      instance.vm.exposed!.visible.value = false
++    }
++  }

  const instance = {
    vm,
++  destroy: manuallyDestroy
  }
  instances.push(instance)
  return instance
}
types.ts
export interface MessageContext {
 // xxx
++  destroy: () => void
}
3.11 添加样式
Message.vue
<div class="message-box" :class="{ [`el-message--${type}`]: type }" :style="cssStyle">
styles/vars.css
:root {
  /* message */
  --el-color-info-light-8: #e9e9eb;
  --el-color-info-light-9: #f4f4f5;
  /* success */
  --el-color-success: #67c23a;
  --el-color-success-light-8: #e1f3d8;
  --el-color-success-light-9: #f0f9eb;
  /* warning */
  --el-color-warning: #e6a23c;
  --el-color-warning-light-8: #faecd8;
  --el-color-warning-light-9: #fdf6ec;
  /* error */
  --el-color-error: #f56c6c;
  --el-color-error-light-8: #fde2e2;
  --el-color-error-light-9: #fef0f0;
}
styles/index.css
@import './vars.css';
@import '../components/Message/style.css';
Message/style.css
.message-box {
  width: max-content;
  position: fixed;
  left: 50%;
  top: 20px;
  transform: translateX(-50%);
  box-sizing: border-box;
  padding: 10px;
  display: flex;
  align-items: center;
  border-radius: 3px;

  border-color: var(--el-message-border-color);
  background-color: var(--el-message-bg-color);
  color: var(--el-message-text-color);
}
/* success */
.el-message--success {
  --el-message-bg-color: var(--el-color-success-light-9);
  --el-message-border-color: var(--el-color-success-light-8);
  --el-message-text-color: var(--el-color-success);
}
/* error */
.el-message--error {
  --el-message-bg-color: var(--el-color-error-light-9);
  --el-message-border-color: var(--el-color-error-light-8);
  --el-message-text-color: var(--el-color-error);
}
/* warning */
.el-message--warning {
  --el-message-bg-color: var(--el-color-warning-light-9);
  --el-message-border-color: var(--el-color-warning-light-8);
  --el-message-text-color: var(--el-color-warning);
}
/* message */
.el-message--message {
  --el-message-bg-color: var(--el-color-info-light-9);
  --el-message-border-color: var(--el-color-info-light-8);
}
main.ts
import { createApp } from 'vue'
import App from './App.vue'
++ import './styles/index.css'
createApp(App).mount('#app')
3.12 总结
-
了解最新的 Vue3 及相关技术 & 优势
-
具备经典组件的设计与开发,提升架构思维和代码设计能力